When a garage door remote stops working, the most common cause is often a depleted battery. Understanding how to replace garage door opener batteries is a simple maintenance task that can save homeowners time and money. Rather than immediately calling for professional help, this guide offers straightforward instructions for replacing batteries in various garage door opener systems.
Anna’s Best Garage & Overhead Doors has assisted countless homeowners with garage door maintenance over the years, and their experts have compiled these proven steps to ensure a successful battery replacement every time.

Signs Your Garage Door Opener Battery Needs Replacement
Before diving into the replacement process, it’s essential to recognize when a battery needs to be replaced. Here are the obvious signs.
- The remote works inconsistently or only at very close range
- The remote’s indicator light appears dim or fails to illuminate at all
- The garage door responds slowly to commands
- Multiple attempts are required before the door activates
- The wall-mounted keypad (if present) shows a low battery warning
Most garage door opener batteries last 1-2 years, depending on usage frequency and environmental conditions. Tracking when batteries were last replaced can help anticipate when maintenance will be needed.
Common Types of Garage Door Opener Batteries
Different garage door systems require different types of batteries. Refer to the table below to identify the correct battery for your garage door opener.
| Device Type | Battery Type | Voltage | Common Brands |
| Older Model Remotes | 9-volt | 9V | Chamberlain, Genie |
| Modern Compact Remotes | CR2032 button cell | 3V | LiftMaster, Craftsman |
| Mid-range Remotes | A23 | 12V | Genie, Linear |
| Larger Remote Units | AAA or AA | 1.5V each | Various |
| Older Backup Systems | Lead-acid | 12V | Chamberlain |
| Newer Backup Systems | Lithium-ion packs | 12V | LiftMaster, Overhead Door |
| Keyless Entry Pads | 9-volt or AAA | 9V/1.5V | Various |
Tools and Materials Needed
Replacing a garage door opener battery requires minimal equipment. You’ll need the appropriate replacement battery for your specific opener model, a small screwdriver (Phillips or flathead, depending on your remote design), and a clean cloth for wiping battery contacts if necessary. Preparing these items before beginning makes the process much smoother and helps avoid damage to the remote housing.
Step-by-Step Guide to Replace Remote Control Batteries
1. Identify Your Remote Type
Different remotes have different battery compartment designs. The most common type is the slide-off cover, which moves in one direction to reveal the battery. Some models use screw-secured covers that require a screwdriver for access, while others feature clip-style covers that need gentle pressure at designated points to release. Keychain remotes often have a small slot designed for prying open.
2. Open the Battery Compartment
For remotes with slide-off covers, look for arrows indicating the direction to push and apply gentle pressure while sliding the cover. If your remote has screws, use the appropriate screwdriver to remove them, keeping the screws in a safe place. Locate the seam around the remote’s perimeter with clip-style covers and insert a small flathead screwdriver or coin into the slot, twisting gently to release.
3. Remove the Old Battery
Note the position and orientation of the old battery, paying particular attention to the positive (+) and negative (-) markings. Carefully remove the old battery, taking care not to damage the contacts. Avoid touching the battery contacts with bare fingers to prevent oxidation.
4. Clean the Battery Contacts (If Needed)
If you notice visible corrosion, gently wipe the contacts with a clean, dry cloth. For stubborn corrosion, a pencil eraser can gently clean the contacts. Ensure they are clean and free of debris before installing the new battery.
5. Install the New Battery
Please insert the new battery in the same orientation as the old one, ensuring it’s seated firmly against the contacts. Verify that the positive and negative terminals align with the marked indicators in the compartment.
6. Close the Battery Compartment
Slide or snap the cover back into place, replace and tighten any screws if applicable, and ensure the compartment is securely closed to protect the battery.
7. Test the Remote
Press the remote button while within range of your garage door. Verify that the indicator light illuminates properly and that the garage door responds correctly to the remote signal.
Replacing Backup Battery Systems
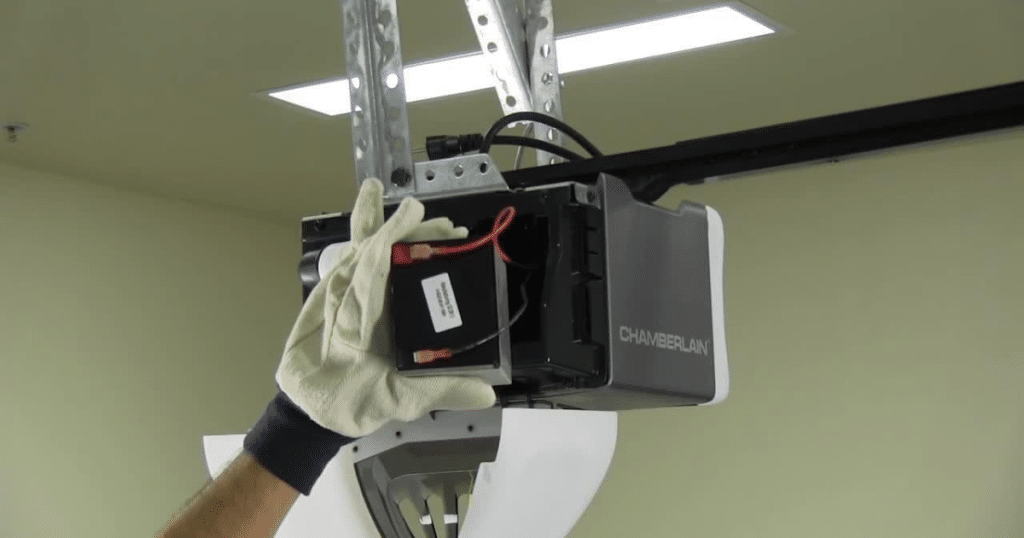
Modern garage door openers often feature backup battery systems that keep the door operational in the event of a power outage. These are typically located on the motor unit mounted to the ceiling and may be covered by a plastic panel secured with screws or clips.
First, disconnect the power to the opener unit to replace these batteries by unplugging it or turning off the circuit breaker. Next, disconnect the wire connectors from the battery terminals and remove any brackets or fasteners securing the battery. Carefully lift the old battery from its compartment.
Install the new battery in the same position as the old one. Secure any brackets or fasteners, and then connect the wire terminals to the corresponding battery terminals (red to positive, black to negative). Ensure connections are tight and secure before restoring power to the opener.
Allow the backup battery to charge if needed (usually 24-48 hours for a full charge), and test the backup system by disconnecting the main power and attempting to operate the door.
Special Considerations for Different Opener Brands
Different manufacturers use various battery types and configurations. Chamberlain, LiftMaster, and Craftsman openers often use 3V CR2032 button batteries for remotes and 12V 4.5Ah sealed lead-acid batteries for backup systems. Genie commonly uses A23 12V alkaline batteries for remotes and may have proprietary rechargeable packs for backup systems.
Linear and Moore-O-Matic models often utilize 9V batteries for remotes and may feature unique battery compartment designs. Overhead Door products utilize various battery types, depending on the model and age, with some keyless entry pads requiring 9V batteries and newer models featuring LED indicators for battery status.
Always refer to your specific model’s manual for precise instructions on battery replacement.
Troubleshooting After Battery Replacement
If the remote still doesn’t work after replacing the battery, verify the installation by checking orientation and contact. Try testing the remote closer to the opener, as the range may be affected by other factors, such as radio interference or obstacles.
Some remotes require reprogramming after battery replacement, so consult your manual for instructions if necessary. Consulting the opener manual or contacting a garage door repair expert may be needed for persistent issues.
Battery Disposal and Environmental Considerations
Proper disposal of old batteries is essential for environmental protection. Many retailers offer battery recycling programs, and local waste management facilities often accept batteries for recycling. Never dispose of batteries in regular household trash, as they can contain harmful chemicals that may leach into soil and water supplies.
Consider using compatible rechargeable batteries to reduce waste and save money in the long run.
Maintenance Tips to Extend Battery Life
To maximize battery performance and longevity, follow these simple practices.
- Store spare batteries in a cool, dry place away from metal objects
- Keep remote controls out of extreme temperatures (avoid hot cars or cold garages)
- Clean battery contacts periodically, even before visible corrosion appears
- Remove batteries from remotes that won’t be used for extended periods
- Use high-quality batteries for longer life and better performance
- Handle batteries with clean, dry hands during installation
- Check battery expiration dates when purchasing replacements
- Consider using battery testers to verify remaining power before disposal
When to Call a Professional
While battery replacement is typically a DIY task, some situations warrant professional assistance from a garage door technician.
- The opener doesn’t work after battery replacement and troubleshooting
- Access to the backup battery requires disassembling the opener
- There are signs of electrical damage or extensive corrosion
- Multiple components are failing simultaneously
- The new garage door operates erratically, even with new batteries
- You notice unusual sounds or movements when operating the door
- The door fails to respond to any remote control commands
- Safety sensors are malfunctioning or misaligned

Frequently Asked Questions
How often should I replace the battery in my garage door opener remote?
Most remote batteries need replacement every 1-2 years, depending on usage frequency and environmental conditions.
Can I use rechargeable batteries in my garage door opener remote?
While it is possible for some models, standard alkaline batteries are generally recommended for optimal performance. Consult your opener’s manual before using rechargeable alternatives.
My remote still doesn’t work after replacing the battery. What should I check next?
Verify correct battery installation, ensure clean contacts, and check for physical damage to the remote. Consider reprogramming the remote if your model requires it after battery changes.
Is it dangerous to replace a garage door opener’s backup battery?
When proper precautions are taken, replacing a backup battery is a safe procedure. Always disconnect power to the opener before accessing the backup battery compartment, and follow the manufacturer guidelines.
How can I tell which battery type my remote needs?
Check your garage door opener manual, look for markings on the old battery, or examine the battery compartment for size and voltage indicators.
Conclusion
Knowing how to replace garage door opener battery components is valuable for any homeowner. This simple maintenance task can extend the life of your garage door system and prevent inconvenient malfunctions. Following the steps outlined in this guide, most homeowners can successfully replace batteries in remotes and backup systems without professional assistance.
For more complex garage door issues or regular maintenance services, Anna’s Best Garage & Overhead Doors provides expert solutions tailored to your specific needs.
End Note
Regular maintenance, including timely battery replacement, helps ensure the reliable operation of garage door systems. Understanding how to replace garage door opener battery components prevents unnecessary service calls and extends the life of your garage door opener.
For professional garage door services, garage door repairs, or complete system replacements, contact Anna’s Best Garage & Overhead Doors for expert assistance tailored to your specific needs. Visit our website to schedule a consultation or learn more about our services in Anna, Texas, and surrounding areas.
